Are you dreaming of a custom-built floating dock to enhance your Texas waterfront property? Whether you want to enjoy tranquil moments or add functionality to your property, a floating dock can make all the difference. Building your dock offers a personal touch and a flexible space for relaxation and recreation. Here’s a step-by-step guide to help you create your ideal DIY Floating Docks.
Why Choose a Floating Dock?
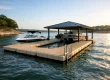
Floating docks are popular for Texas lakes due to their flexibility and durability. They adapt easily to varying water levels, providing a stable platform for various activities, from lounging to boating. With floating docks for boats and personal watercraft, you can enjoy your waterfront property like never before. DIY enthusiasts will find that constructing your own Do It Yourself docks allows for customization and hands-on involvement, making the project all the more rewarding.
Step 1: Plan Your Dock Design
Before diving into construction, plan out your dock’s design. Consider what you want to use it for. Will it primarily accommodate boats or jet skis or provide a relaxing space? If you’re aiming for a larger dock, the 40” x 120” Dock offers generous space. The 40” x 60” Dock could be perfect for something more compact. And if you need ample room for various activities, the 100” x 80” Dock provides a strong platform.
Step 2: Gather Your Materials
To build a floating dock, you’ll need several essential materials:
- Floats: Made from durable polyethylene, these keep your dock buoyant.
- Decking: Choose between wood or composite materials based on your budget and maintenance preferences.
- Frames: Constructed from aluminum or treated wood, they form the structural support.
- Hardware: Bolts, screws, and brackets are essential for assembly. If you’re considering drive-on docks, ensure that the frame is robust enough to handle the weight and use of your vehicle.
Step 3: Build the Frame
Start by constructing the frame of your dock. This foundational step ensures that your dock is sturdy and stable. Use treated lumber or aluminum to provide strength and durability. Make sure the frame is level to avoid any tilting or instability. This step is crucial for Do It Yourself docks, as a well-constructed frame ensures a secure and functional dock.
Step 4: Attach the Floats
Once the frame is built, attach the floats. Distribute them evenly to maintain balanced buoyancy. Securely fasten the floats to the frame to prevent any shifting. For docks hosting personal watercraft, including PWC ports, place them in convenient locations for easy access and retrieval.
Step 5: Install the Decking
With the floats in place, it’s time to add the decking. Secure it properly to ensure a stable and comfortable surface. If using wood, consider treating it to withstand the elements, especially in the hot Texas sun. Composite decking is a low-maintenance option that can provide a lasting finish.
Step 6: Final Adjustments and Anchoring
Finally, anchor your dock securely to the lakebed using concrete anchors or heavy-duty stakes. Make any necessary adjustments to ensure that your dock is level and stable. If you plan to use drive-on docks, ensure they are positioned correctly and can handle the load.
Conclusion
Building a floating dock is a fulfilling project that enhances your enjoyment of your Texas waterfront property. EZ Dock Texas offers high-quality options that can complement your design. Our docks are designed to be maintenance-free and durable, making them a fantastic choice for anyone looking to invest in a lasting solution. Ready to start your DIY dock project? Contact us for a personalized quote or call 1-800-654-8168. We’re here to assist with all your dock needs.